Understand Your Lighting Controls
Understanding how to use the Watts 2.0 application is going to unlock the install you’ve been wishing for. In this Watts 2.0 tutorial we dive in to the main features and interfaces in the Watts 2.0 app and learn how to redecorate your home with a few swipes of your thumb.

Why Did I Create My Own Watts 2.0 Tutorial?
There are absolutely resources for how to use and troubleshoot Watts 2.0 direct from the manufacturer, but I haven’t found yet somewhere to direct customers to a thorough walkthrough of all the features in both video and text. And so voila! Here is a thorough step by step instruction set for getting what you want out of your Watts 2.0 system.

Step by Step Watts 2.0 Tutorial
Watts 2.0 Greeting Screen
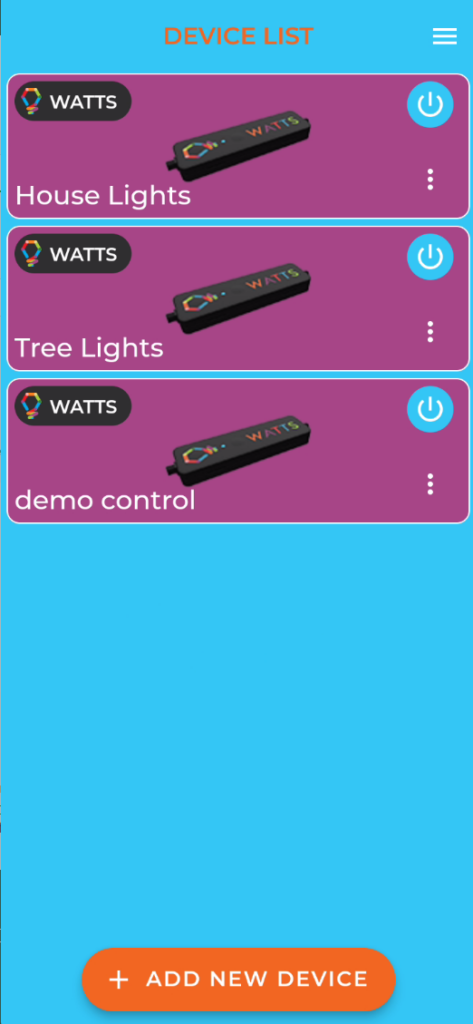
As long as you are logged in, this is the first screen you’ll see when you open your Watts 2.0 application.
Each of the controllers registered to your Watts 2.0 account will be shown on their own purple banner. You can turn them off and on with the blue power buttons, access additional information about the controllers from the 3 dot menus, and access the lighting controls by clicking elsewhere on the purple banners.
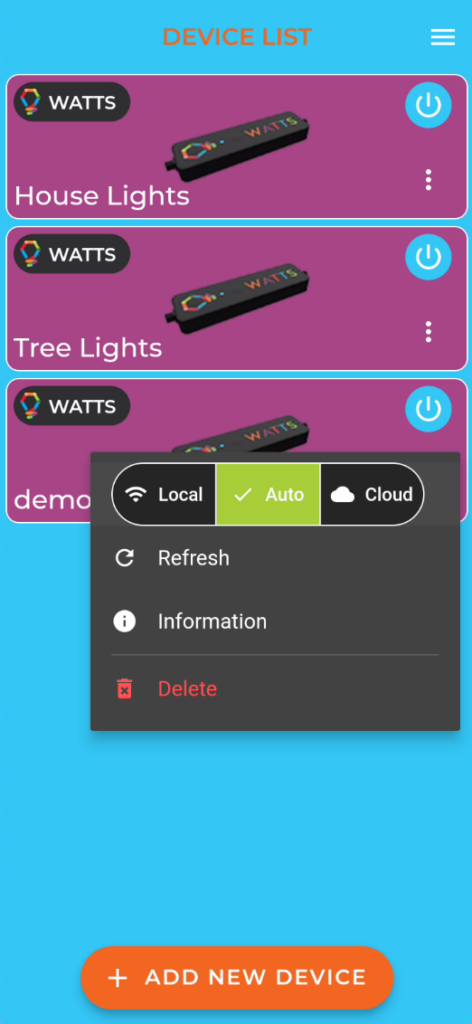
Selecting the three dot menu for a lighting controller shows controls that allow you to select how to connect to your controller.
Local will only connect to your controller through your home wifi. Your smartphone must be on your home wifi as well.
Cloud will pass all instructions through the Watts servers and then to the controller on your home wifi. This results in slower response times but allows connectivity anywhere you have an internet connection on your smartphone.
Auto will try to connect by local first (because it’s faster) and revert to cloud connectivity if local connection cannot be established.
In this menu you can also refresh the controller connection. If the wifi signal is intermittent, refreshing can help to get the latest information.
Selecting Information takes you to additional info about your controller.
Delete will remove the controller from your account. This is most often used when you want to change the wifi network the controller is connected to.
Information Screen
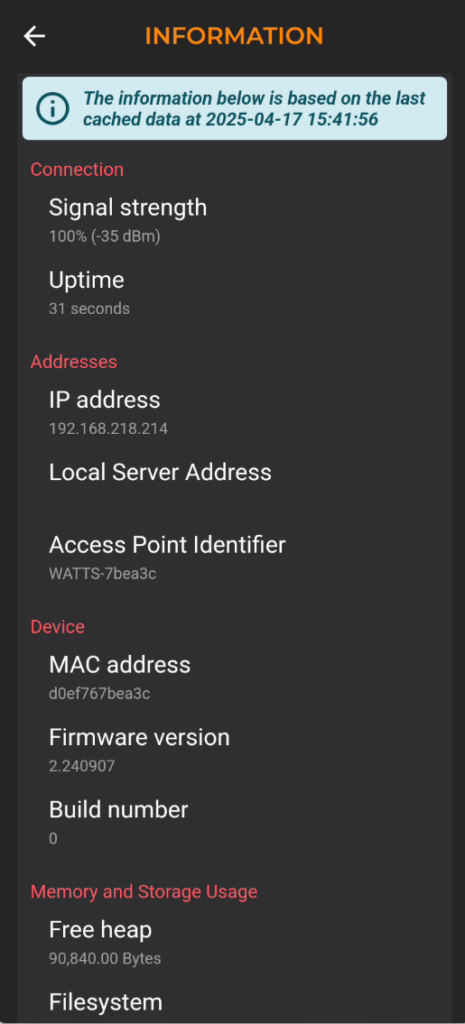
The Information screen provides critical information about the lighting controller. If you are struggling with connectivity or controls this is the first place to look for trouble.
Signal Strength lists a percentage as well as a dBm measurement. This is a measure of the strength of WiFi signal the lighting controller is receiving from your router. This is not a measure of your phone’s WiFi signal strength.
The dBm measurement is always a negative number and the closer it is to zero the better: -43dBm is stronger than -45dBm. Measurements better than -60dBm are ideal. Measurements better than -70dBm are acceptable.
MAC address is a unique identifier for a specific piece of hardware. Watts tech support may ask for this series of numbers and letters if they are helping to troubleshoot to identify your controllers history of connectivity with the Watts servers.
Firmware version This is essential info during troubleshooting. New firmware is released regularly.
Watts 2.0 PRESETS Tab
Once in the lighting controls across the top is displayed the title of the controller you are connected to, the connection type is displayed (local or cloud), there is a blue circular power button, and a three line (hamburger) menu button.
At the bottom of the screen are the 4 tabs you’ll use for navigation between the different lighting control features.
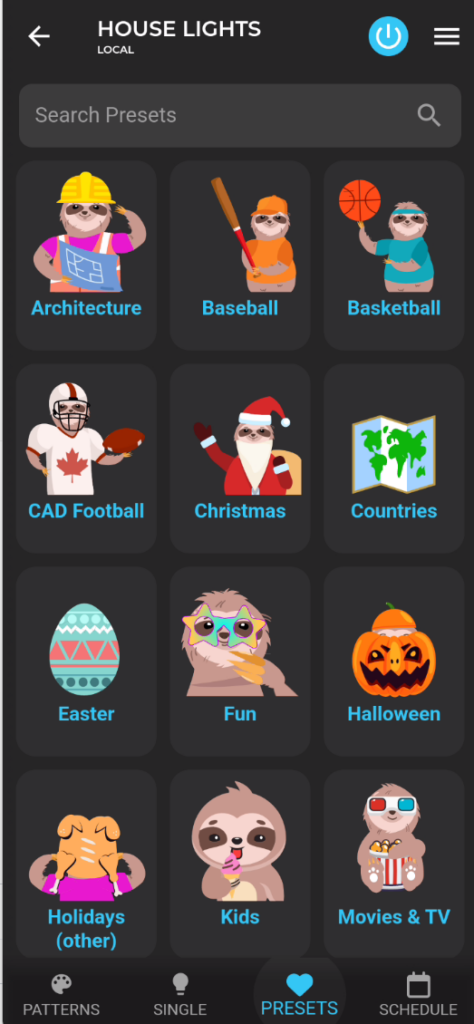
This is the PRESETS tab. Displayed are categories of patterns and animations curated by Watts Lights. Select a category to see the patterns within it.
Within a PRESETS Category
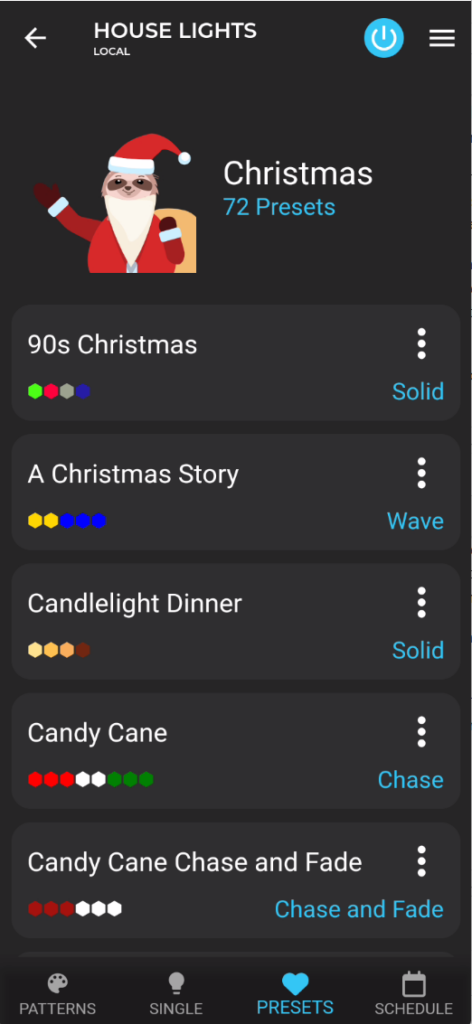
Within a specific PRESETS Category you’ll see the category title, a themed picture of Donnie the sloth, and a count of how many presets are in the category.
Below is a list of presets in the category organized alphabetically. Each preset has
- a title in Grey
- Coloured Hexagons that show the colours in the pattern
- Blue Text that indicates what animation is used in that preset. “Solid” is a static pattern (no animation), everything else has some type of motion to it.
Press on a preset to make it the active pattern on your lighting system.
Watts 2.0 Patterns Tab
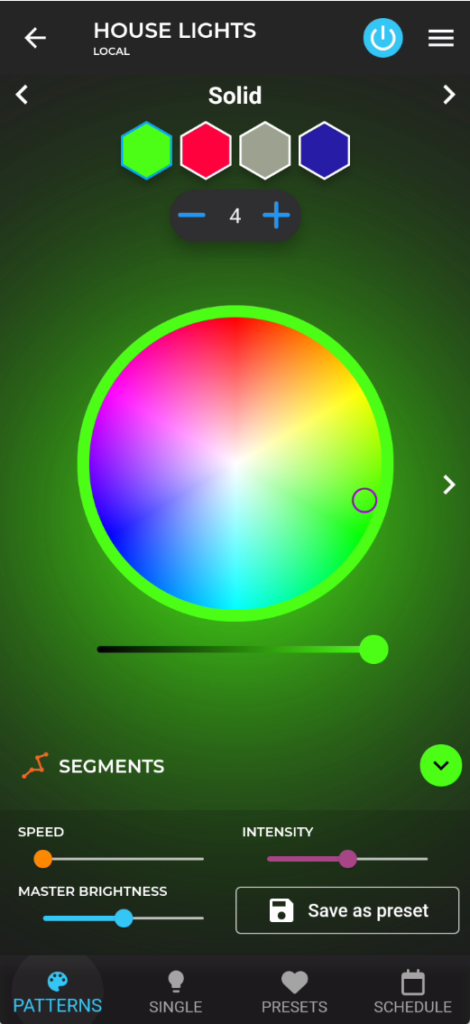
The Patterns tab will show how whatever pattern is currently displayed is constructed and allows you to customize.
At the top is the Animation Selector which in this pictures shows “solid” Click on the white text there to be presented with a list of selectable animations.
Next are the Colour Hexagons. Select a hexagon and it will become bordered in blue. Your next colour selection will apply to the selected hexagon. The colours in these hexagons are repeated across your installation.
Next is the Number of Colours Selector. It’s set to 4 in this picture, hence 4 colour hexagons displayed. You can adjust this to any number between 1 and 12.
Next is the Colour Picker. There is a colour wheel, and a brightness slider, and between those two controls you can customize your colours to over sixteen million different options. Selections made here will apply to the currently selected Colour Hexagon. Swiping right on the colour picker will reveal other ways of selecting colours.
Below the Colour Picker is the text Segments. If you have segments set up on your light installation selecting the text that says “SEGMENTS” will you take you to the segment controls.
At the bottom of the Patterns Tab are control sliders:
- Speed controls how quickly animations move on your installation. It does nothing when the “solid” animation is selected.
- Master Brightness controls the brightness of the entire installation.
- Intensity is a wildcard control. It has different effects on different animations. For example, on the “Blocks” animation, the intensity slider changes how many lights are included in each “block” of colour.
Selecting Save as Preset will prompt you to give your pattern a unique name and save it to the User Presets list which is found after all the preloaded Preset categories on the Presets Tab.
Watts 2.0 Single Bulb Control
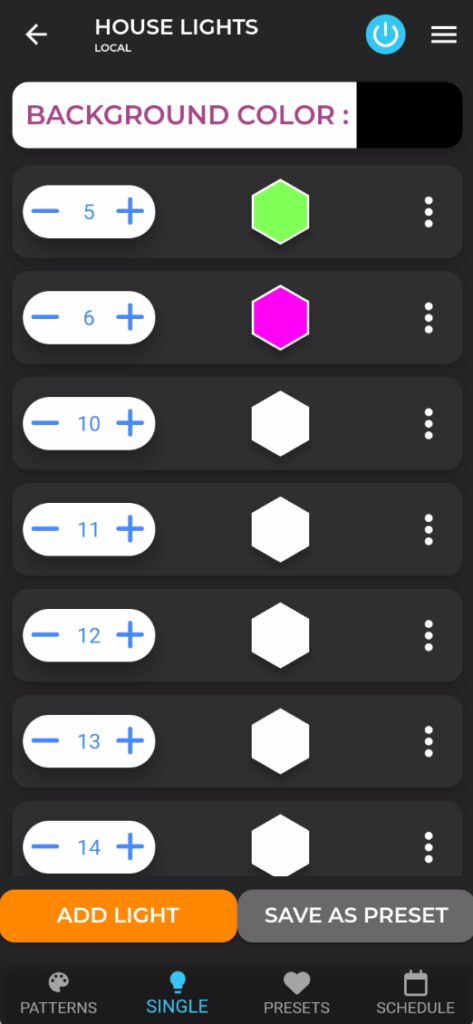
This is the most time consuming way of interacting with your lights and gives you the most refined control over exactly what your display looks like.
Every single light in a Watts Lights installation has a number: the first light out of the control box is light number zero, and they count up by ones until the end of the installation.
In the picture you can see individual lights have been assigned colours, light number 5 is green, light 6 is pink, lights 10 through 14 are white.
Selecting Background Color brings you to a colour picker. Whatever colour is chosen here will be applied to all lights that are not given a specific instruction. In this photo the background colour is black which is the same as having those lights turned off.
To effectively set up a Single bulb pattern it’s essential to be able to see your installation. This is a great “cold beverage on a hot day” activity. Once you’ve completed your look ensure you select “Save As Preset” to preserve your work.
Watts 2.0 Scheduling
The Schedule tab is where you set up prompts to automate your lights so they turn on, change patterns, and turn off when you want without needing to do it manually.
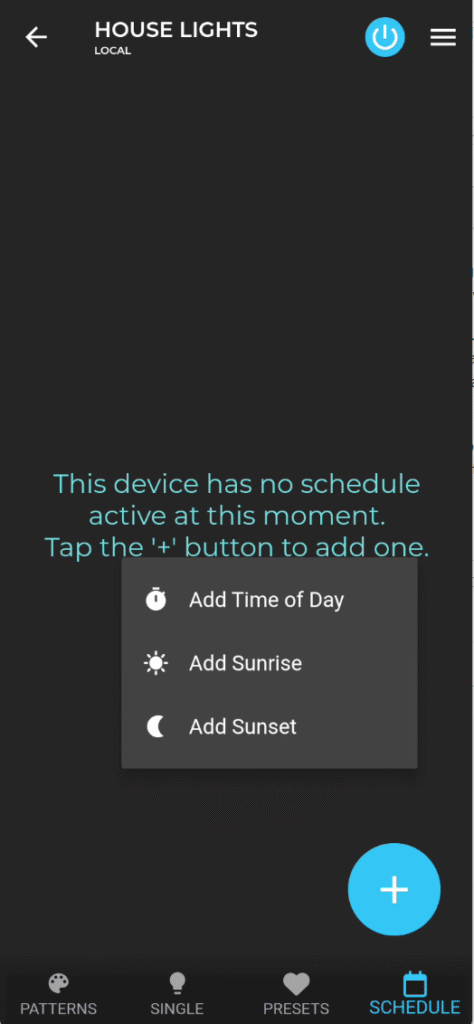
When you first select the schedule tab, the schedule will be empty. Select the big blue + symbol. You can add schedule prompts that trigger at a specific time of day, sunrise, or sunset.
Sunrise and sunset use approximate GPS location of your device that your installers set up for you and an online sunrise/sunset calendar to adjust trigger times as the days get longer and shorter throughout the year.
Schedule Prompt Setup
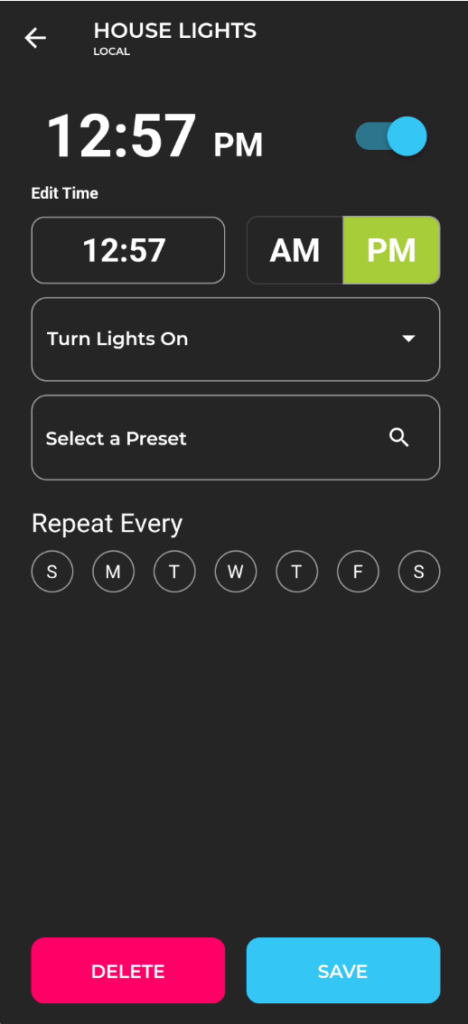
Select the type of prompt you want and you’ll see a screen like this. In this example I selected a “time of day” prompt.
First select what time of day you want the action you’re setting up to trigger.
Next select what type of action you want. In this example you can see this action will “Turn Lights On”. If you click there you can alternatively select “Turn Lights Off”
If your prompt is turning the lights on, you’ll need to select what pattern the lights come on as. Select “Select a Preset” and you’ll be taken to a screen where you can pick the pattern of your choice.
under Repeat Every
There are circles for each day of the week. Select the days of the week (they’ll highlight in green when selected) that you want this prompt to operate.
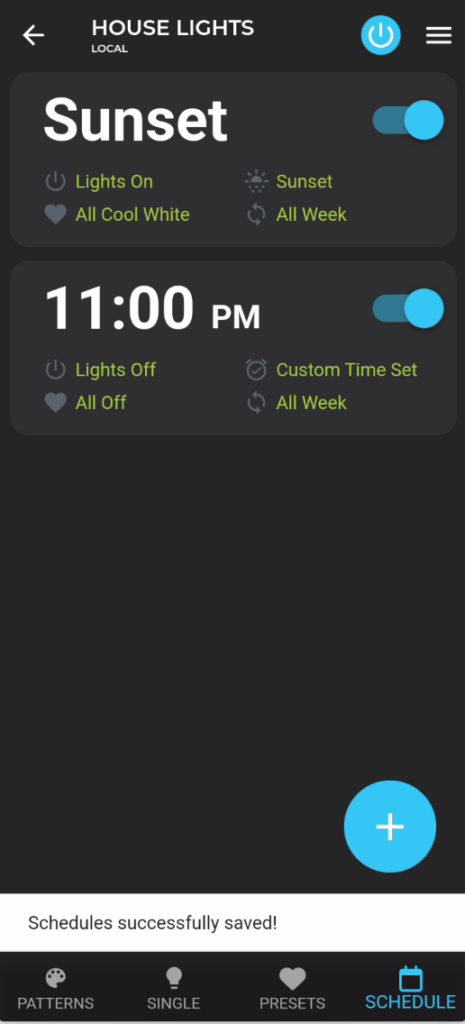
Here is a simple completed schedule.
You can see the set prompts are summarized, the lights will come on as cool white at sunset every day, and then turn off at 11:00 pm.
You can certainly get more complicated than this, setting different lights out times for different days of the week, chaining multiple “on” prompts to have the colours change throughout the day, or having lights come on for an hour while leaving for work.
Is That the Whole Watts 2.0 Tutorial?
It is for now, but there is even more you can do with your system. Keep an eye out for instructions on troubleshooting, segmentation, and controller syncing!
In the meantime, with this tutorial you should have a solid foundation in how to create looks you want, save them, and automate your system so your home lighting operates all on its own.
There is so much more we do…
If you thought our light installation was impressive, we offer exceptional window cleaning, gutter cleaning, and siding washing services to keep your home the talk of the neighbourhood year after year.